Keeping Dust Down: Ways to Use Clay Safely

Back in my ceramics classes in college, there really wasn’t any concern for clay dust. It could be smelled (and seen) upon walking into the classroom, and I didn’t think much of it. Maybe your experience is similar. When I got my first job, I began thinking about best practices and what safety looked like within an art room. My classroom originally had a canvas system (canvas mats for working and canvas covering the wedging table). Anything that traps clay is a problem, because it can’t be fully washed. For example, when a canvas mat is used, and clay seeps into the fibers, that clay dries and eventually becomes airborne the next time a student pulls out that canvas mat. The same problem occurs with wrapping a wedging table in canvas.
Why is this a problem, exactly? Because silica (clay dust) is unhealthy to breathe—your lungs have difficulty filtering it out. Once in the air, silica particles can stay airborne for hours (or even days!), so it’s especially important to be proactive.

Replacing Canvas
I started by taking the canvas off of the wedging table, and replaced it with marine fabric (the same material used for boat covers). This fabric is extremely strong, comes in a roll, and the best thing is that you can wipe it completely clean! No clay stays trapped in the fibers. I liked having black as the color because it made it really easy to tell if the clay was all wiped off.
For individual projects, I went to the hardware store and bought masonite boards for each student (shown on top of the table). This made a huge different in keeping dust down.
Talking with Maintenance
A little while into my first teaching job, I found out that the maintenance crew was sweeping my classroom floor most nights. I met with them to let them know that sweeping would put those particles into air which would harm their lungs, and asked them to mop as needed instead. Depending on how many ceramics classes you teach, you may need to mop more or less often. Mopping will actually clean those particles off the floor, whereas sweeping often just puts the particles in the air and then settles back down. This leads me to my next point…
Cleaning Rags
I have found that the best tool for cleaning is microfiber towels, by far. It seems obvious, but I have also found that students clean more thoroughly when the tools for cleaning are good (not dingy or old, and well-suited to the task). To keep dust down, clay items must be cleaned wet. So, getting a microfiber towel wet and then cleaning boards, tools, and tables at the end of class goes pretty quickly, instead of sponges (need to be squeezed out) or scrubbers (leave clay still on the surface).
Aprons
This point is particularly helpful for wheel-throwing. Aprons that are made of fabric (or using towels to protect the legs from splashes of clay) is another way that dust enters the air in the classroom. Plus, it’s difficult to get those items clean when they become too caked with clay to continue. Plastic aprons are a great solution because they cover a great amount of surface area and are super easy to wipe off. Many of my students like to wear rain ponchos while they throw on the wheel because they keep clay off of their clothes and are easy to wipe clean.
Kiln Room Ventilation
This point is not related to clay dust, but is still an important safety concern when using clay. When kilns are fired, they release certain components into the air that are not meant to be breathed. Kilns ideally should not be within the same classroom space that you teach. Often, they are in small storage spaces or “kiln rooms”. What is most important is that they are vented, and that air around the kiln is sucked out of the room. In my first classroom, the kilns were both vented and had a chimney feature that drew air up and out of the building. If you don’t have a system like this, I would ask for a HEPA air purifier for wherever your kiln is placed.
SDS Sheets
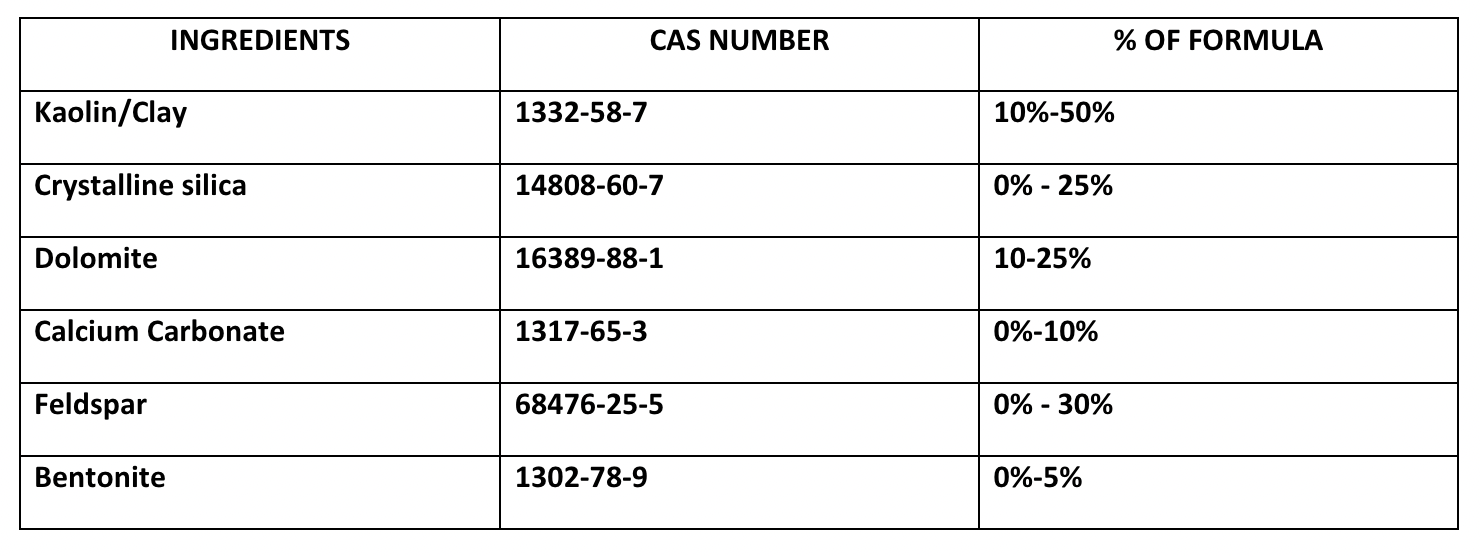
Have you ever checked those SDS sheets that come with art supplies? They tell you what materials are in the product and if any safety precautions need to be taken. I find these sheets especially helpful when choosing a type of clay because some clays have more silica than others. In this way, you can effectively reduce the amount of silica in your room by starting at the source. The two images below are excerpts of SDS sheets for two different types of clay. The top image shows a high fire clay, and the middle image shows a low fire clay. I put a screenshot at the very bottom that shows one example of how you might navigate a website to find the SDS sheet (Blick is shown in this instance).

As you can see, crystalline silica could make up to 40% of the clay body in this particular high fire clay.
Here, crystalline silica can only make up to 25% of the clay body in this low fire clay. I would also note, however, that sometimes other added ingredients can negatively impact health. For example, talc is also a common ingredient found in some clay bodies, but it can contain asbestos.

Here is the screenshot of what an SDS page might look like.
In the end, teaching ceramics is SO fun—and keeping things safe in the classroom makes it even more enjoyable. I hope you found these tips helpful and are able to apply them in your own spaces!